“I should get into MVVM”, this is what I said in one of my previous blog post.
Now after a while I decided to port/change a (big) project I’m doing to MVVM (#YOLO).
Now I really want to share some experiences. Like my previous project I used Entity Framework 6.
This time I’ll use SQL rather than SQLite (in code it’s exactly the same). And again I made use of a CollectionViewSource for my DataGrid.
So first thing first: What is MVVM?
It stands for Model View ViewModel. It’s a design pattern that uses databinding.
Why should you check out MVVM?
Because MVVM separates all functions for your application (Bussiness Logic, UI, …).
It makes your code a lot easier to understand and to maintain! It’s just a lot sleeker 😉
NOTE: MVVM can be overkill for small applications! It can add a lot more code for a simple app. The sample we will make is a small project and I still think it can benefit from MVVM.
It will make it easier to add new functionality!
Another advantage is, it’s easy to test (Unit tests, …). I will not go deeper in this part because I’m not familiar with unit testing (I should look into this as well).
If you want to know more about MVVM itself, you should check out the wikipedia page / MSDN / Codeproject.
They have some nice explanations about MVVM. But the main point of this post is how to implement it 🙂

So the model part of your application describes your data.
As an example a car. Your model would be a car class with some properties like colour horse power, brand, max speed, …
Doesn’t this sound familiar? You models are tables in your database. And because we use Entity Framework we already have our tables in classes.
So the model part is actually generated for you. Some people like to wrap these objects in “real” model classes but because this cause a lot of duplicated code I decided to use EF generated classes directly as my models.
Because these classes are also partial it’s easy to add code (like datavalidation). This makes it easy to add an extra property that doesn’t need to be changed in the ds(like a bool where the value is dependent of another property (Convertor property)).
Little example: A string that contains an URL to an image that changes depending on how good your grades are.
if (this.grades > 16)
  return "greensmiley.png";
else if (this.grades > 10)
  return "orangesmiley.png"
else
  return "redsmiley.png"
Ofcourse you could use a Convertor for this problem, but I like the simplicity of this solution (the disscussion on what is better is out scope for this post).
ViewModel
This code will take care of logic. I will do the conversion from your UI to your models (data). The most important part in our EF application is ofcourse loading data and CRUD operation (Create, Read, Update and delete!)
Every Window / Usercontrol normally has his own ViewModel. But you can make a ViewModel for every UI element. As example one grid in your Window shows data about cars and another grid shows data about drivers.
To make your application “easier” (maintable) is a good practise to split this logic. Maybe the drivers are read – only so they need less functionality than the cars part.
In this case your would have a VW for your Window and two for the grids. The Window ViewModel will have an object of the other ViewModels (Composition has – a). In the UI just simple bind on the correct object and done.
If this is not clear I’m sure it will in my project example.
View
This one you already now. It is your Window / Usercontrol. With other words your XAML files!
You know that with each XAML file there is an XAML.cs file aka the code behind. In MVVM it’s your goal too keeps this empty!
Events will not be used (there is somehting else, see example). And logic is in your ViewModel. So your codebehind should only load your View (InitializeComponent();).
As an example I will use the same as in a previous blog post (link). I will have a table that will store school results.
This time I’ll use SQL (LocalDB) instead of a SQLite file (This doesn’t change anything, only the preparations check my post why: Get SQLite Provider for EF working).
Practical
Model:
Add EF to your project, add the Entity Framework Data Object and done. Like my previous example I use Database first.
The model is your data. EF generates classes of your SQL data, so like I said your model is finished…
In some bigger projects it’s easy when your model properties implement INotifyPropertyChanged. This can be done by editing the EntityFramework script that generates your models.
This isn’t that difficult, but can be hard (no intellisense). It can be easily found on stack overflow. But if you want some information, let me know.
Some MVVM people are against using INotifyPropertyChanged on your model, but this disscussion is out the scope of this post!
A link to a stackoverflow post: http://stackoverflow.com/questions/6922130/in-mvvm-model-should-the-model-implement-inotifypropertychanged-interface
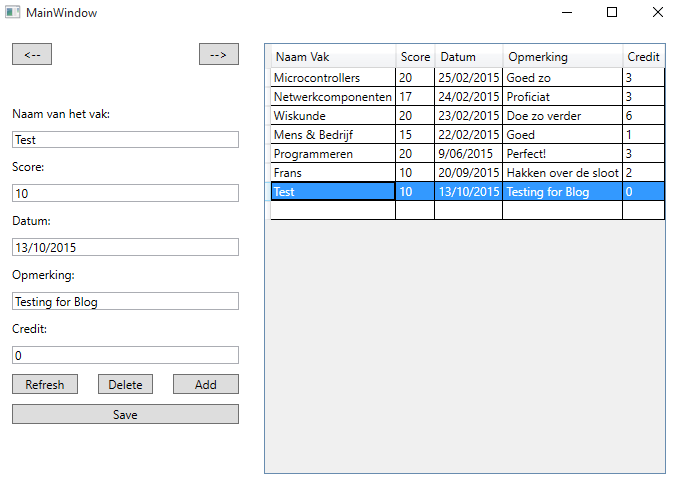
View:
Printscreen:
Now the code behind:
Like I said it should be empty 😛
But we still need to load the View.
And I also add the databinding. This is bad practise, but to keep it simple I did it!
When you use some MVVM toolkits it’s easier to do it in the XAML file.
public MainWindow()
{
  InitializeComponent();
  this.DataContext = new MainWindowViewModel();
}
So here is a post to move the binding to the XAML file:
https://social.msdn.microsoft.com/forums/vstudio/en-US/59fad0a0-13bb-4a1e-aeee-ec6e622a2913/mvvm-bind-view-to-viewmodel-via-xaml
Let’s start programming!
Now we will start building the ViewModel.
I use a the UI of the previous example. You don’t need to know that exercise. The UI if shown in a printscreen above!
You should have enough knowledge to build this UI in XAML! (There is also a copy of my solution file available, it’s somewhere in the bottom of this post!)
Loading data
This can be done in a separate DAL file. But for simplicity I added this code in my MainWindowViewModel!
public CollectionViewSource Collection { get; private set; }
private DatabaseEntities _ctx;

public MainWindowViewModel()
{
  Collection = new CollectionViewSource();
  LoadData();
}

private void LoadData()
{
  Refresh();
}

public void Refresh()
{
  _ctx = new DatabaseEntities();
  _ctx.Schoolresultaten.Load();
  Collection.Source = _ctx.Schoolresultaten.Local;
  Collection.SortDescriptions.Add(new SortDescription("ID", ListSortDirection.Ascending)); //Orders the datagrid based on ID
}
Again I’ll use the CollectionViewSource. What does this code do? It loads the data and change the source of our CollectionViewSource to that data.
Nothing special 🙂 If you don’t understand this, you should read one of my previous blog posts!
The last line code in the Refresh method is useless in this example, because I don’t show the id in the datagrid.
But there are applications where you need to show it (Example: Client ID). If you add a new Client and want that the DataGrid keeps sorted on his ID you need that line of code 🙂
Showing Data
How are we going to show the results in the table / the selected result in the textboxes?
We will use binding. One of MVVM keypoints is binding! This will be used to communicate between the ViewModel and the View!
We already have the collection, we will use this as ItemSource for the table!
But we still need a property to save the current selected result!
Add something like this in your ViewModel:
#region SelectedItem
private Schoolresultaat _selectedItem;

public Schoolresultaat SelectedItem
{
  get { return _selectedItem; }
  set
  {
    _selectedItem = value;
    NoticeMe("SelectedItem");
  }
}
#endregion
For this part you have to implement INotifyPropertyChanged! Because we use binding we have to make sure the View gets updated when we change this property.
Now we can add a datagrid in our View, this will generate our table (Check the bindings! Aka: ItemSource and SelectedItem):
<DataGrid x:Name="schoolresultatenDataGrid" Margin="25,0,0,0" Grid.Column="1" Grid.RowSpan="2" RowDetailsVisibilityMode="VisibleWhenSelected" EnableRowVirtualization="True" AutoGenerateColumns="False" ItemsSource="{Binding Collection.View}" SelectedItem="{Binding SelectedItem}">
<DataGrid.Columns>
<DataGridTextColumn x:Name="naamVakColumn" Binding="{Binding NaamVak}" Header="Naam Vak" Width="Auto"/>
<DataGridTextColumn x:Name="scoreColumn" Binding="{Binding Score}" Header="Score" Width="Auto"/>
<DataGridTextColumn x:Name="datumColumn" Binding="{Binding Datum}" Header="Datum" Width="Auto"/>
<DataGridTextColumn x:Name="opmerkingColumn" Binding="{Binding Opmerking}" Header="Opmerking" Width="Auto"/>
<DataGridTextColumn x:Name="creditColumn" Binding="{Binding Credit}" Header="Credit" Width="Auto"/>
</DataGrid.Columns>
</DataGrid>
Now for the textboxes (used two – way binding because we will also use this textboxes to add new results / modify exsisting results):
<TextBlock Margin="0,0,0,10" Text="Naam van het vak:</TextBlock>
<TextBox Text="{Binding SelectedItem.NaamVak, Mode=TwoWay}></TextBox>
<TextBlock Margin="0,10,0,10" Text="Score:"></TextBlock>
<TextBox Text="{Binding SelectedItem.Score, Mode=TwoWay}"></TextBox>
<TextBlock Margin="0,10,0,10" Text="Datum:"></TextBlock>
<TextBox Text="{Binding SelectedItem.Datum, Mode=TwoWay}"></TextBox>
<TextBlock Margin="0,10,0,10" Text="Opmerking:"></TextBlock>
<TextBox Text="{Binding SelectedItem.Opmerking, Mode=TwoWay}"></TextBox>
<TextBlock Margin="0,10,0,10" Text="Credit:"></TextBlock>
<TextBox Text="{Binding SelectedItem.Credit, Mode=TwoWay}"></TextBox>
Next step, adding next and previous buttons
Like I already said we don’t have codebehind so we also don’t have events…
So no button functionality??? Ofcourse not, in MVVM you’ll use commands.
Start by adding a Commands folder to your solution. Add a new class in this folder:
using System.Windows.Input;
using EntityFrameworkMVVM.ViewModels;
namespace EntityFrameworkMVVM.Commands
{
public class NextCommand : ICommand
{
private MainWindowViewModel _viewModel;
public NextCommand(MainWindowViewModel viewModel)
{
_viewModel = viewModel;
}
public event EventHandler CanExecuteChanged
{
add { CommandManager.RequerySuggested += value; }
remove { CommandManager.RequerySuggested -= value; }
}
public bool CanExecute(object parameter)
{
return true;
}
public void Execute(object parameter)
{
if (_viewModel.Collection.View.CurrentPosition &lt; _viewModel.Collection.View.SourceCollection.Cast<object>().Count() - 1)
_viewModel.Collection.View.MoveCurrentToNext();
}
}
}
This is my command that will be executed when I press the Next Button in my view.
How does this actually work?
First start with making a new class that implements ICommand (Add using System.Windows.Input).
Implement the interface (add all members), there should be one property and two methods
First of all we make a event to add our command to the CommandManager. This is necessary is you want to execute the command from your view!
The syntax should be familiar to you (+= to add event, -= to remove).
Than we have our two methods.
The first CanExecute expects a bool as return value.
If this bool is true the Button is Enabled, if this is false the button is disabled.
This can be nice if you want to disable a button based on some value…
The execute method will hold your actual logic! This is what you program in your callback function of your event in ‘normal’ WPF.
Important fact, I added my viewModel that will use this command. I did this in the constructor. (To be able to do this, don’t forget to add your ViewModels with using!)
The will make it possible to execute methods in my ViewModel. In this solution, I use the Collection from my VM.
The rest of my logic in the execute method is self – explainatory!
Now we still have to add this command to our ViewModel and View!
For our ViewModel we just add our created Commands. We can than initialize them in our constructor.
public NextCommand NextEvent { get; private set; }
public PreviousCommand PreviousEvent { get; set; }

public MainWindowViewModel()
{
//Previous code

  NextEvent = new NextCommand(this);
  PreviousEvent = new PreviousCommand(this);
}
We will give as parameter this, which means the current ViewModel (aka the MainWindowViewModel).
Now we can bind the buttons to this commands!
<Button Content="<--" HorizontalAlignment="Left" Padding="10,2,10,2" VerticalAlignment="Top" Command="{Binding PreviousEvent}" />
<Button Content="-->" HorizontalAlignment="Right" Padding="10,2,10,2" VerticalAlignment="Top" Command="{Binding NextEvent}" />
So our buttons doesn’t have a name and a Click event anymore, all there code behind is gone! Instead there is a binding on Command!
In my solution I also added a Command for the previous button… (Check solution for the code!)
So because of the binding to SelectedItem, the results in the textboxes will change when you use the next / previous button!
Saving changes
Again I added a button and a command to add functionality to the button without code behind!
The code for the command will 99% be the same as our earlier command! Only the name and the execute method are different:
public void Execute(object parameter)
{
  _viewModel.SaveChanges();
}
Code in ViewModel:
public void SaveChanges()
{
  _ctx.SaveChanges();
}
That was easy 🙂 (<3 EntityFramework)
Add results
To add results I again added a button. The functionality of this button will be if you click this button, you can add a new result with the exsisting textboxes.
At the moment you click on the button, the text of the button will change to “Cancel”. If click on the button when the text is Cancel the database will be reloaded!
To save the new client just use the save button 🙂
First we need a string in our ViewModel that will be used for the text in the button!
Just use a full property with a notifier on set:
#region ButtonAddContent Full Property
private string _buttonAddContent;
public string ButtonAddContent
{
  get
  {
     return _buttonAddContent;
  }

  set
  {
    _buttonAddContent = value;
    NoticeMe("ButtonAddContent");
  }
}
#endregion
Now our execute functionality of our command:
public void Execute(object parameter)
{
  if (_viewModel.ButtonAddContent == "Add")
  {
    Schoolresultaat addResult = new Schoolresultaat();

    //This part can be handy when you have to search manual for an ID
    //In our example I use the Autoincrement function of SQL.
    //But I wanted to share this, because I used it in another project (and aswell in my EF blog post)!
    //If you want to use this, disable AI on the table in SQL!
    //
    //int tempId = 0;
    //
    //Search for first valid ID
    //while (_viewModel.Collection.View.SourceCollection.Cast<Schoolresultaat>().Any(r => r.id == tempId)) //The ViewSource.View contains every Result, but first I have to cast it back to a result!
    //{
      //tempId++;
    //}

    //addResult.id = tempId;

    _viewModel.SelectedItem = addResult;
    _viewModel.ButtonAddContent = "Cancel";
  }

  else
  _viewModel.SelectedItem = _viewModel.Collection.View.CurrentItem as Schoolresultaat;
}
So if the text in the button is Add, we make a temporaly ‘Schoolresultaat’.
Than I added a part of code that is useless for this example, but maybe can be used in your project (explaination in comments).
Next step is to change the SelectedItem to that temp result. The textboxes are now “connected” to our temp result because of two way databinding!
So if we change the values off the textboxes the properties of the temp result will change.
Last thing is to change the content (text) of the button to Cancel!
Now if the content was cancel, we just “reload” our SelectedItem to one of our existing results.
Now why don’t I change the text of the button now?
That’s because I do this somewhere else! If you think about it every time I select an other result the text of the button has to change back to ‘Add’.
We also change the SelectedItem in our else. So I change my content of the button every time the SelectedItem changes:
public Schoolresultaat SelectedItem
{
  get { return _selectedItem; }
  set
  {
    _selectedItem = value;
    NoticeMe("SelectedItem");
    ButtonAddContent = "Add";
  }
}
We still have to add our new result to the database!
We have to extend our save functionality:
public void Add()
{
  _ctx.Schoolresultaten.Add(SelectedItem);
}

public void SaveChanges()
{
  if (ButtonAddContent == "Cancel")
  {
    Add();
  }

  _ctx.SaveChanges();
  ButtonAddContent = "Add";
}
This is self – explainatory 🙂
And again shows the strength of EntityFramework!
Refresh
Last but not least I like the add a cancel button (discard changes) in this post.
Again add your command and execute the _viewModel.Refresh() method and done 🙂
Now I was planing to add some other functionality. But this blog post is already rather long 😀
So I’ll keep it for a next post!
Thanks!
So I hope you enjoyed reading.
The last thing I promised was a link to my solution:
Here it is!
First, this is my experience I share to the world 🙂
I’m a newbie @ MVVM but still wanted to help people who are searching for a straight forwarded explaination!
In this example I didn’t use any MVVM “toolkit”. I didn’t use any non standard wpf code. I think this is important for learning MVVM.
But In a pratical project you would better use a MVVM toolkit, they allow you to make your life a an MVVM developper easier!
They add functionality so you don’t have to write it al by your self! Examples are MVVM Light, Prism, Cinch and many more!
Maybe I’ll do a post about these!
Second, I hope you like MVVM. And see the benefits of using it in your application!
And last, If you see something incorrect or would like to add somehting let me know in the comments!
Thanks for reading!

[…] UPDATE 13/10/2015/ I made another post about MVVM and EntityFramework. After reading this, you should really check that one out! It’s really worth it to use MVVM 🙂 Link to another post: Click Here […]
LikeLike
Wow, nice job! Now I understand your insightful questions yesterday…at first I was thinking “well, he understood my talk fast”…but apparently you did some preresearch 😉
LikeLike
Yeah I ported a big application to MVVM that I was building as freelancer:
ATM: It’s still visible / public on GitHub: https://github.com/ErazerBrecht/IsisStandAlone
LikeLike
[…] UPDATE: I added Entityframework, to this example in another blog post Later I added the MVVM pattern in this blog post! […]
LikeLike
Hello,
good tutorial, but which is the password for mega?
LikeLike
Thanks, I really appreciate it! 🙂
I updated the link, so you don’t need a password anymore!
Happy coding!
LikeLike
Nice tutorial, but some code is related to ISIS, the well known terror organization…
using ISIS.ViewModels;
namespace ISIS.Commands
Is it a scaring joke?
LikeLike
Managed to add inline editing for the grid, but how to search?
LikeLike
Got it myself. This sample was a good starting point. Thank you.
I found a lot of improvements related to MVVM, reusable code, and code once for your sample.
Especially the ICommand implementation could be enhanced using one single file.
It should not use the manager at all because of performance.
I fixed some issues with save and delete too.
Some resources:
https://code.msdn.microsoft.com/vstudio/How-to-bind-command-to-a-299f7759/sourcecode?fileId=132325&pathId=723248190
LikeLike
Thank you, this was just what I was looking for to get a foot in MVVM + Entity.
LikeLike